> ## Documentation Index
> Fetch the complete documentation index at: https://docs.docketqa.com/llms.txt
> Use this file to discover all available pages before exploring further.
# Creating a Test
> How to create a test on Docket
### Prerequisites
First, go to the [test suites](/essentials/test-suite) page to create a test suite that the test will belong to.
### Creating a Test
To get started with writing a test on Docket, you should:
1. Navigate to the tests tab on the left
2. Click "Create New Test"
3. Enter a title, select a test suite, and provide an entrypoint URL (the starting point for your test)
4. Click "Launch Browser"
 The URL you provide will be where the Docket Browser agent automatically navigates to begin executing your test.
> **Learn more**: For detailed information about the persistent browser/device instance and its controls, see the [Remote Screen](/essentials/remote-screen) documentation.
> **Testing a native mobile app?** Instead of an entrypoint URL, mobile tests target a [mobile app](/essentials/mobile-apps) on a simulator or emulator. See the [Mobile Apps](/essentials/mobile-apps) guide for supported devices and build requirements.
### Building Your Test
To create tests on Docket, you can simply interact in the [remote screen](/essentials/remote-screen) and Docket will record actions alongside English annotations automatically.
There are six types of steps you can write on Docket:
1. **[Recorded Steps](/essentials/recorded-steps)** - Precise coordinate-based actions that replay exactly as recorded and self-heal when the UI changes
2. **[AI Steps](/essentials/ai-steps)** - Natural language instructions that adapt to your UI dynamically
3. **API Steps** - Network requests to endpoints for seeding, setup, and teardown of test resources
4. **Code Steps** - Run sandboxed Python to transform data, manage files, call APIs, or drive the browser
5. **Modules** - Reusable collections of steps that can be shared across multiple tests
6. **Trigger Run** - Trigger another Docket test and pass variables between them
Learn more about each step type to understand when to use them.
### API Steps
API steps allow you to make network requests to any endpoint during your test execution. They're incredibly powerful for creating dynamic, data-driven tests that can fully manage test resources throughout their lifecycle.
**Common use cases:**
* **Test Setup**: Creating test data, user accounts, or resources before the main test flow
* **Test Seeding**: Populating databases or systems with necessary data
* **Dynamic CRUD Operations**: Create resources, store their IDs, then update or delete them later in the test
* **Test Teardown**: Cleaning up resources after test completion
API steps support all HTTP methods (GET, POST, PUT, DELETE, PATCH, etc.) and pass when they receive a 2xx response status code.
##### Extracting Response Data
API steps can extract data from responses and store them in variables using **JSON Path** expressions. This enables powerful workflows where you create resources and use their IDs in subsequent steps.
The URL you provide will be where the Docket Browser agent automatically navigates to begin executing your test.
> **Learn more**: For detailed information about the persistent browser/device instance and its controls, see the [Remote Screen](/essentials/remote-screen) documentation.
> **Testing a native mobile app?** Instead of an entrypoint URL, mobile tests target a [mobile app](/essentials/mobile-apps) on a simulator or emulator. See the [Mobile Apps](/essentials/mobile-apps) guide for supported devices and build requirements.
### Building Your Test
To create tests on Docket, you can simply interact in the [remote screen](/essentials/remote-screen) and Docket will record actions alongside English annotations automatically.
There are six types of steps you can write on Docket:
1. **[Recorded Steps](/essentials/recorded-steps)** - Precise coordinate-based actions that replay exactly as recorded and self-heal when the UI changes
2. **[AI Steps](/essentials/ai-steps)** - Natural language instructions that adapt to your UI dynamically
3. **API Steps** - Network requests to endpoints for seeding, setup, and teardown of test resources
4. **Code Steps** - Run sandboxed Python to transform data, manage files, call APIs, or drive the browser
5. **Modules** - Reusable collections of steps that can be shared across multiple tests
6. **Trigger Run** - Trigger another Docket test and pass variables between them
Learn more about each step type to understand when to use them.
### API Steps
API steps allow you to make network requests to any endpoint during your test execution. They're incredibly powerful for creating dynamic, data-driven tests that can fully manage test resources throughout their lifecycle.
**Common use cases:**
* **Test Setup**: Creating test data, user accounts, or resources before the main test flow
* **Test Seeding**: Populating databases or systems with necessary data
* **Dynamic CRUD Operations**: Create resources, store their IDs, then update or delete them later in the test
* **Test Teardown**: Cleaning up resources after test completion
API steps support all HTTP methods (GET, POST, PUT, DELETE, PATCH, etc.) and pass when they receive a 2xx response status code.
##### Extracting Response Data
API steps can extract data from responses and store them in variables using **JSON Path** expressions. This enables powerful workflows where you create resources and use their IDs in subsequent steps.
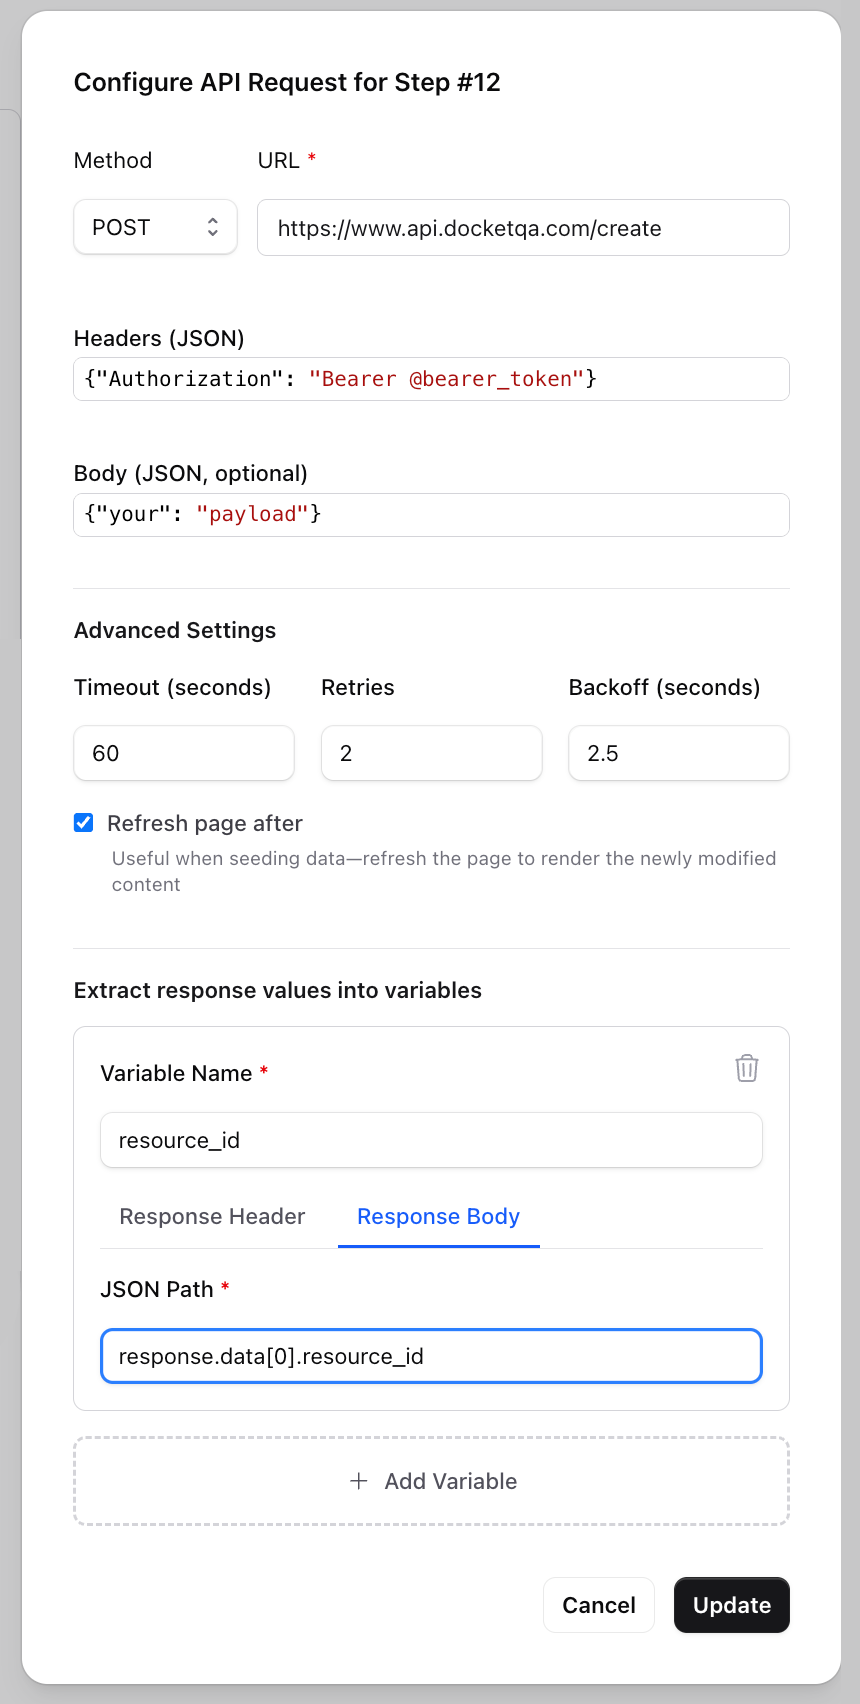 In the example above, we're extracting a `resource_id` from a nested API response. Notice how the request also uses `@bearer_token` in the Authorization header—this token was likely extracted from a previous authentication API call, demonstrating how you can chain multiple API steps together.
**Response structure:**
```json theme={null}
{
"response": {
"data": [
{"resource_id": 123, "other_data": "..."},
{"resource_id": 456, "other_data": "..."}
]
}
}
```
**JSON Path:** `response.data[0].resource_id`\
**Result:** Extracts `123` and stores it in the `@resource_id` variable
##### Dynamic CRUD Example
API steps become extremely powerful when you combine variable extraction with multiple requests:
1. **Create** a product via POST and extract its ID to `@product_id`
2. **Update** the product via PUT to `https://api.example.com/products/@product_id`
3. Use the product in your UI test flow
4. **Delete** the product via DELETE to `https://api.example.com/products/@product_id` for cleanup
This pattern allows you to create fully isolated, repeatable tests that manage their own test data dynamically without polluting your database or depending on pre-existing resources.
### Code Steps
A **Code Step** runs a snippet of **Python** at a point in your test. Reach for one when a step needs real logic that [AI Steps](/essentials/ai-steps) and [Recorded Steps](/essentials/recorded-steps) aren't meant for: transforming data, reading or creating files, calling an API, or computing a value to reuse later.
**Common uses:**
* Generate or transform test data (e.g. a unique payload or a signed token)
* Read an [uploaded file](/essentials/file-upload) or browser download and extract a value
* Call an external API and save part of the response
* Drive the browser directly with Playwright
##### How It Works
Your code is the body of a function with two values already in scope:
| Name | Type | Description |
| ----------- | --------------------------- | --------------------------------------------------------------------------- |
| `context` | Playwright `BrowserContext` | The live browser the test is driving. `None` on mobile (iOS/Android) tests. |
| `variables` | `dict[str, str]` | The test's variables. Read and write them here. |
Whatever you store in `variables` is saved back to the test automatically; no `return` is needed.
```python theme={null}
import requests
resp = requests.get("https://api.ipify.org?format=json")
variables["my_ip"] = resp.json()["ip"]
```
Saved values appear in the run results and can be referenced by later steps as `@my_ip`.
> **Storing variables:** Values must be strings; wrap others with `str(...)` or `json.dumps(...)`. Use plain literal keys (`variables["token"]`), not dynamically computed ones, so Docket can detect the variable names.
In the example above, we're extracting a `resource_id` from a nested API response. Notice how the request also uses `@bearer_token` in the Authorization header—this token was likely extracted from a previous authentication API call, demonstrating how you can chain multiple API steps together.
**Response structure:**
```json theme={null}
{
"response": {
"data": [
{"resource_id": 123, "other_data": "..."},
{"resource_id": 456, "other_data": "..."}
]
}
}
```
**JSON Path:** `response.data[0].resource_id`\
**Result:** Extracts `123` and stores it in the `@resource_id` variable
##### Dynamic CRUD Example
API steps become extremely powerful when you combine variable extraction with multiple requests:
1. **Create** a product via POST and extract its ID to `@product_id`
2. **Update** the product via PUT to `https://api.example.com/products/@product_id`
3. Use the product in your UI test flow
4. **Delete** the product via DELETE to `https://api.example.com/products/@product_id` for cleanup
This pattern allows you to create fully isolated, repeatable tests that manage their own test data dynamically without polluting your database or depending on pre-existing resources.
### Code Steps
A **Code Step** runs a snippet of **Python** at a point in your test. Reach for one when a step needs real logic that [AI Steps](/essentials/ai-steps) and [Recorded Steps](/essentials/recorded-steps) aren't meant for: transforming data, reading or creating files, calling an API, or computing a value to reuse later.
**Common uses:**
* Generate or transform test data (e.g. a unique payload or a signed token)
* Read an [uploaded file](/essentials/file-upload) or browser download and extract a value
* Call an external API and save part of the response
* Drive the browser directly with Playwright
##### How It Works
Your code is the body of a function with two values already in scope:
| Name | Type | Description |
| ----------- | --------------------------- | --------------------------------------------------------------------------- |
| `context` | Playwright `BrowserContext` | The live browser the test is driving. `None` on mobile (iOS/Android) tests. |
| `variables` | `dict[str, str]` | The test's variables. Read and write them here. |
Whatever you store in `variables` is saved back to the test automatically; no `return` is needed.
```python theme={null}
import requests
resp = requests.get("https://api.ipify.org?format=json")
variables["my_ip"] = resp.json()["ip"]
```
Saved values appear in the run results and can be referenced by later steps as `@my_ip`.
> **Storing variables:** Values must be strings; wrap others with `str(...)` or `json.dumps(...)`. Use plain literal keys (`variables["token"]`), not dynamically computed ones, so Docket can detect the variable names.
 ##### Browser Access
In browser tests, `context` is a synchronous Playwright `BrowserContext` you can drive directly:
```python theme={null}
page = context.pages[0]
variables["page_title"] = page.title()
```
##### Files
* The working directory holds your [uploaded files](/essentials/file-upload). Open them by name: `open("data.csv")`.
* Files your code creates persist for later steps **in the same run**.
* Browser-downloaded files live under `/tmp/docket-downloads/`; open them with the full path.
##### Runtime & Limits
Code runs in an isolated sandbox:
* **Synchronous Python only** (no `async`/`await`).
* Default **timeout of 120 s**, configurable per step.
* Importable: the full standard library plus `requests`, `PyPDF2`, `numpy`, `PIL` (Pillow), `openpyxl`, `docx`, and `faker`. Nothing is pre-imported, so `import` what you use.
* Outbound HTTP(S) to public endpoints works; localhost and private/LAN addresses are blocked unless the run uses a [tunnel](/essentials/tunnel).
* No process spawning (`subprocess`, `os.system`, `multiprocessing`).
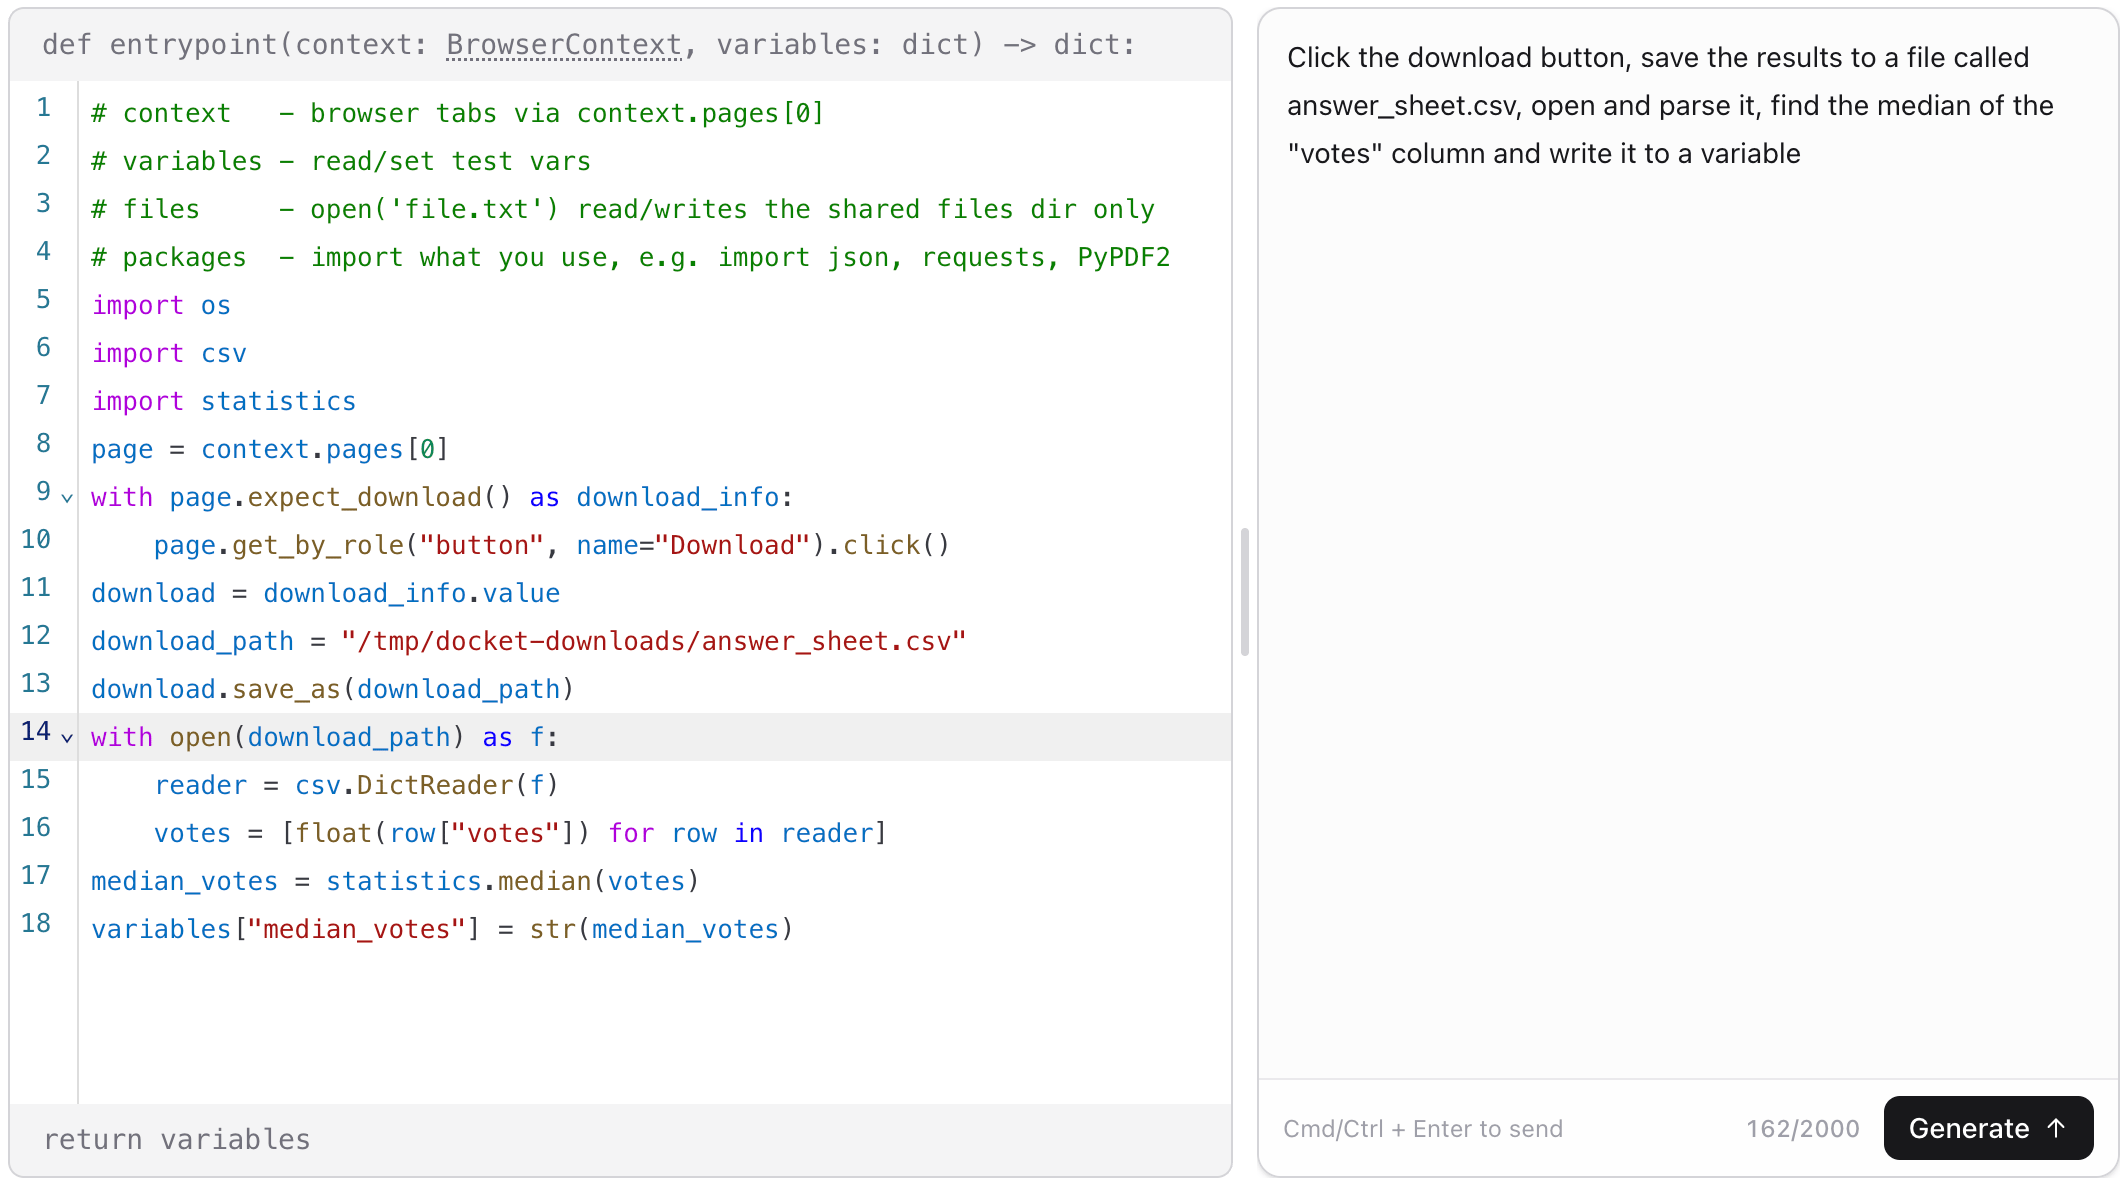
##### Generate Code with AI
Don't want to write Python? Describe the step in plain English and Docket's assistant writes it for you, aware of the available packages, `context`, and `variables`. Review before saving.
##### Results
Expand a code step in the run view to see its output, formatted like every other action:
* **STDOUT / STDERR**: captured output (STDERR turns red when the step fails)
* **Created Variables**: values written to `variables`, shown as `@name = "value"`
* **Created Files**: files the step wrote
A code step **passes** unless it raises an unhandled error, times out, or exceeds a limit.
### Modules
Modules are reusable collections of steps that can be created once and inserted into multiple tests. They're perfect for common workflows like logging in, navigating to a specific page, or performing setup tasks that are repeated across many tests.
**Key features:**
* **Create and manage** modules in the "Modules" section of Docket
* **Compose with any step type**: Modules can contain AI steps, recorded steps, and API steps
* **Can nest**: A `step_module` step inside a module references another module (up to 5 levels deep)
* **Universal**: One module works across every browser viewport, iOS device, and Android device — modules inherit the running screen's config rather than carrying their own
* **CRUD interface**: The module creation interface is similar to test creation, with a [remote screen](/essentials/remote-screen) for recording interactions
##### Variables in Modules
Modules have specific rules around variable usage:
* **Can reference variables**: Modules can use variables (like `@user_email` or `@auth_token`) that are defined in the tests where the module is used
* **Can extract from API calls**: Modules can create new variables by extracting values from API response bodies within the module
* **Cannot define variables**: Modules cannot create their own text, email, or random alphanumeric variables
* **No file uploads**: Modules do not support file management
This design keeps modules focused and portable—they rely on the parent test for variable definitions and file resources while still being able to extract and pass data through API calls.
**Common use cases:**
* Standard navigation sequences
* Common setup or teardown operations
* Shared API authentication workflows
* Repeated multi-step interactions
### Trigger Run
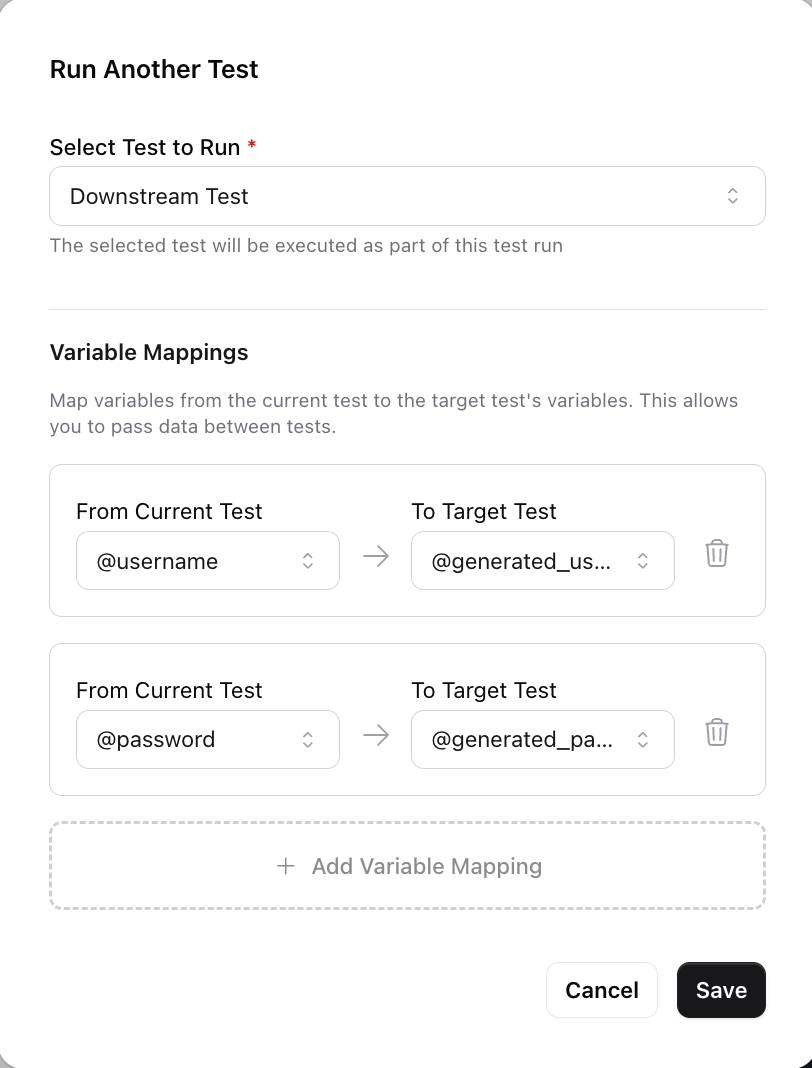
Trigger Run steps execute another Docket test from within your current test. Useful for dependent tests—e.g., a "Create Account" test that triggers a "Login" test, passing the credentials via variable mapping.
**Key features:**
* **Trigger any test**: Select another test in your workspace to run as a step
* **Variable mapping**: Pass variables from the current test to the triggered test, allowing data to flow between tests
* **Run skipped tests**: Trigger Run is the programmatic way to execute tests with [Suite Run Behavior](#suite-run-behavior) set to "Skipped"
##### Browser Access
In browser tests, `context` is a synchronous Playwright `BrowserContext` you can drive directly:
```python theme={null}
page = context.pages[0]
variables["page_title"] = page.title()
```
##### Files
* The working directory holds your [uploaded files](/essentials/file-upload). Open them by name: `open("data.csv")`.
* Files your code creates persist for later steps **in the same run**.
* Browser-downloaded files live under `/tmp/docket-downloads/`; open them with the full path.
##### Runtime & Limits
Code runs in an isolated sandbox:
* **Synchronous Python only** (no `async`/`await`).
* Default **timeout of 120 s**, configurable per step.
* Importable: the full standard library plus `requests`, `PyPDF2`, `numpy`, `PIL` (Pillow), `openpyxl`, `docx`, and `faker`. Nothing is pre-imported, so `import` what you use.
* Outbound HTTP(S) to public endpoints works; localhost and private/LAN addresses are blocked unless the run uses a [tunnel](/essentials/tunnel).
* No process spawning (`subprocess`, `os.system`, `multiprocessing`).
##### Generate Code with AI
Don't want to write Python? Describe the step in plain English and Docket's assistant writes it for you, aware of the available packages, `context`, and `variables`. Review before saving.
##### Results
Expand a code step in the run view to see its output, formatted like every other action:
* **STDOUT / STDERR**: captured output (STDERR turns red when the step fails)
* **Created Variables**: values written to `variables`, shown as `@name = "value"`
* **Created Files**: files the step wrote
A code step **passes** unless it raises an unhandled error, times out, or exceeds a limit.
### Modules
Modules are reusable collections of steps that can be created once and inserted into multiple tests. They're perfect for common workflows like logging in, navigating to a specific page, or performing setup tasks that are repeated across many tests.
**Key features:**
* **Create and manage** modules in the "Modules" section of Docket
* **Compose with any step type**: Modules can contain AI steps, recorded steps, and API steps
* **Can nest**: A `step_module` step inside a module references another module (up to 5 levels deep)
* **Universal**: One module works across every browser viewport, iOS device, and Android device — modules inherit the running screen's config rather than carrying their own
* **CRUD interface**: The module creation interface is similar to test creation, with a [remote screen](/essentials/remote-screen) for recording interactions
##### Variables in Modules
Modules have specific rules around variable usage:
* **Can reference variables**: Modules can use variables (like `@user_email` or `@auth_token`) that are defined in the tests where the module is used
* **Can extract from API calls**: Modules can create new variables by extracting values from API response bodies within the module
* **Cannot define variables**: Modules cannot create their own text, email, or random alphanumeric variables
* **No file uploads**: Modules do not support file management
This design keeps modules focused and portable—they rely on the parent test for variable definitions and file resources while still being able to extract and pass data through API calls.
**Common use cases:**
* Standard navigation sequences
* Common setup or teardown operations
* Shared API authentication workflows
* Repeated multi-step interactions
### Trigger Run
Trigger Run steps execute another Docket test from within your current test. Useful for dependent tests—e.g., a "Create Account" test that triggers a "Login" test, passing the credentials via variable mapping.
**Key features:**
* **Trigger any test**: Select another test in your workspace to run as a step
* **Variable mapping**: Pass variables from the current test to the triggered test, allowing data to flow between tests
* **Run skipped tests**: Trigger Run is the programmatic way to execute tests with [Suite Run Behavior](#suite-run-behavior) set to "Skipped"
 ### Lifecycle Hooks
Lifecycle hooks allow you to attach optional [modules](#modules) that run automatically at specific points in your test execution. Configure these in the "Lifecycle Hooks" tab of your test.
**Setup Hook**\
Runs after any account login (if configured) and before the first test instruction. Perfect for creating test resources via [API steps](#api-steps) and storing their IDs in variables.
**Teardown Hook**\
Runs after the test completes, regardless of whether it passed or failed. Ideal for cleaning up resources created during the test.
The most powerful use of lifecycle hooks is pairing setup and teardown modules with [API steps](#api-steps):
1. **Setup module**: Create resources via API POST requests, extract their IDs to variables (e.g., `@test_user_id`, `@order_id`)
2. **Test**: Use these resources in your UI test flow by referencing the variables
3. **Teardown module**: Delete the resources via API DELETE requests using the stored IDs
This pattern ensures each test run starts with a clean environment and doesn't leave behind test data, making your tests fully isolated and repeatable.
## Test Variables
Variables can be created in the Variables tab and referenced in test instructions using `@variable_name` syntax. Test-level variables take precedence over [suite-level variables](/essentials/test-suite#variables).
### Lifecycle Hooks
Lifecycle hooks allow you to attach optional [modules](#modules) that run automatically at specific points in your test execution. Configure these in the "Lifecycle Hooks" tab of your test.
**Setup Hook**\
Runs after any account login (if configured) and before the first test instruction. Perfect for creating test resources via [API steps](#api-steps) and storing their IDs in variables.
**Teardown Hook**\
Runs after the test completes, regardless of whether it passed or failed. Ideal for cleaning up resources created during the test.
The most powerful use of lifecycle hooks is pairing setup and teardown modules with [API steps](#api-steps):
1. **Setup module**: Create resources via API POST requests, extract their IDs to variables (e.g., `@test_user_id`, `@order_id`)
2. **Test**: Use these resources in your UI test flow by referencing the variables
3. **Teardown module**: Delete the resources via API DELETE requests using the stored IDs
This pattern ensures each test run starts with a clean environment and doesn't leave behind test data, making your tests fully isolated and repeatable.
## Test Variables
Variables can be created in the Variables tab and referenced in test instructions using `@variable_name` syntax. Test-level variables take precedence over [suite-level variables](/essentials/test-suite#variables).
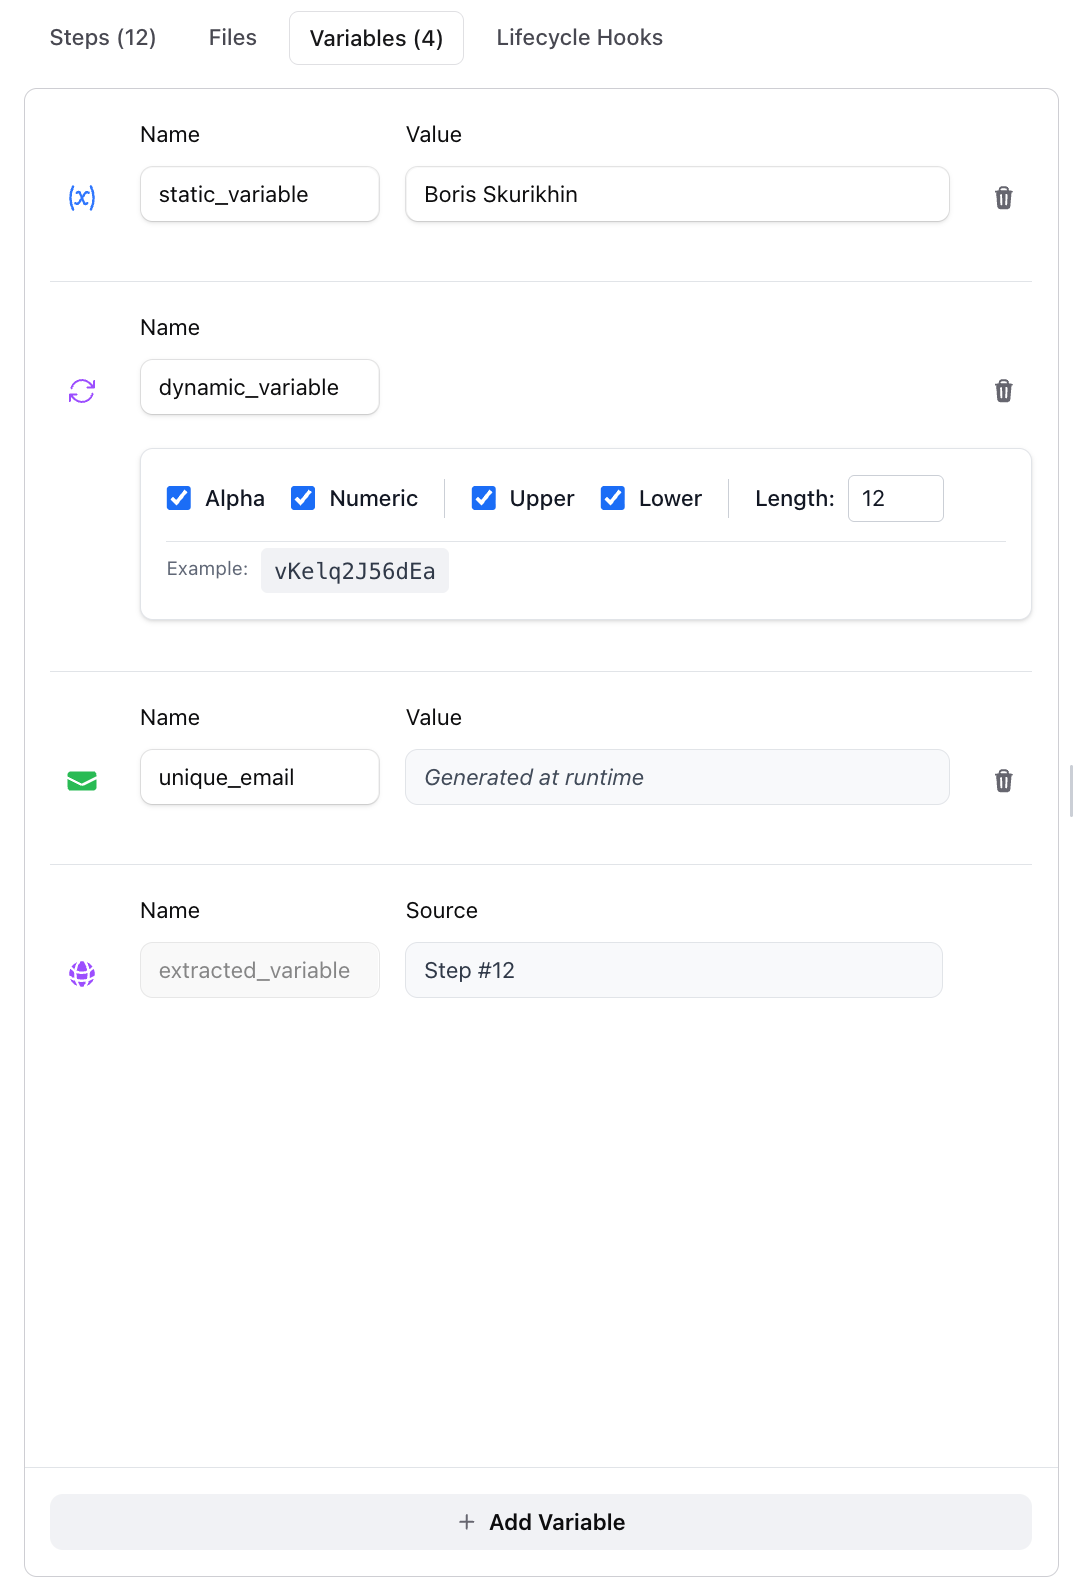 ### Text Variables
Static values that remain constant throughout test execution. Ideal for credentials, product names, or configuration values.
### Dynamic Variables
Generate pseudorandom strings with configurable length and character sets. Perfect for unique usernames, product IDs, or any data requiring uniqueness.
### Email Variables
Choose a [plus address](/essentials/dedicated-mailboxes#plus-addresses) configured in your Email Settings, or generate a unique random address per test run. The agent can monitor these addresses for incoming emails—perfect for verification codes, magic links, and OTPs.
### Extracted Variables
Created dynamically by capturing data from API responses using JSON Path (from response body) or directly from response headers. Use these to store auth tokens, resource IDs, or session identifiers. See [API Steps](#api-steps) for examples.
## Advanced Test Configuration
Configure additional settings to fine-tune your test execution behavior.
### Text Variables
Static values that remain constant throughout test execution. Ideal for credentials, product names, or configuration values.
### Dynamic Variables
Generate pseudorandom strings with configurable length and character sets. Perfect for unique usernames, product IDs, or any data requiring uniqueness.
### Email Variables
Choose a [plus address](/essentials/dedicated-mailboxes#plus-addresses) configured in your Email Settings, or generate a unique random address per test run. The agent can monitor these addresses for incoming emails—perfect for verification codes, magic links, and OTPs.
### Extracted Variables
Created dynamically by capturing data from API responses using JSON Path (from response body) or directly from response headers. Use these to store auth tokens, resource IDs, or session identifiers. See [API Steps](#api-steps) for examples.
## Advanced Test Configuration
Configure additional settings to fine-tune your test execution behavior.
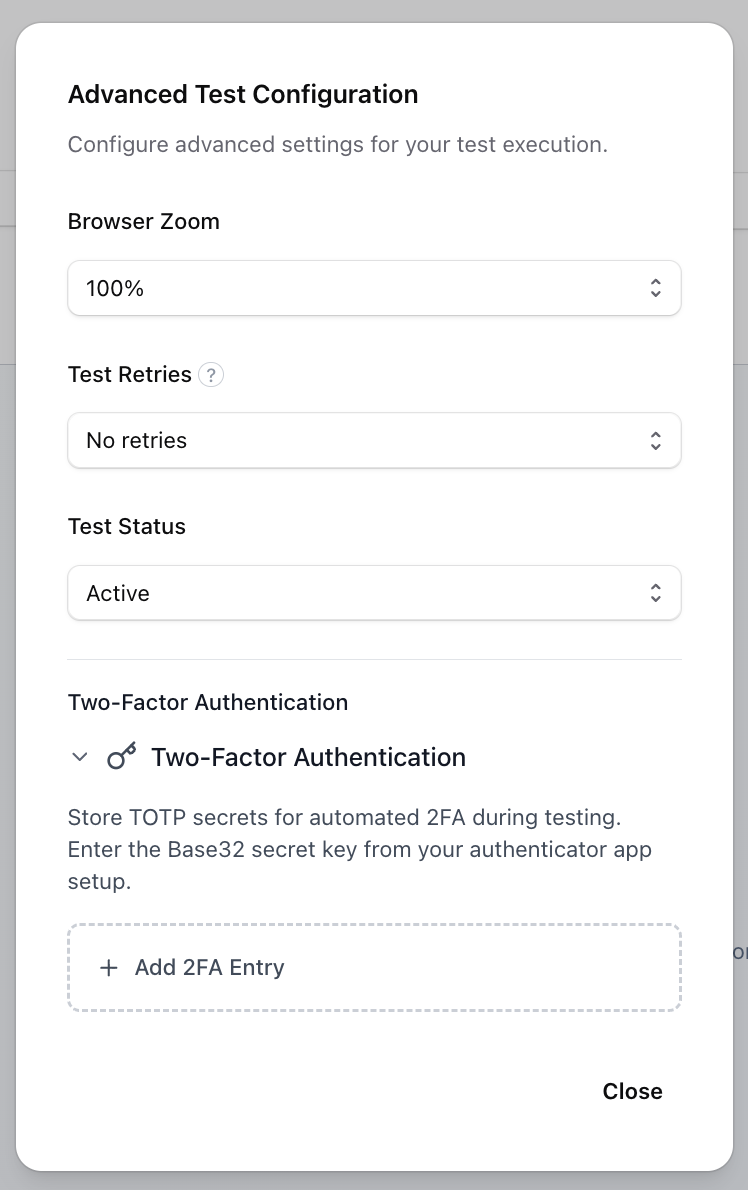 ### Browser Zoom Level
Control the browser's zoom level (equivalent to `Ctrl +/-` in Chromium). Useful for testing responsive design and accessibility.
**Options:** 50%, 75%, 100% (default), 125%, 150%, 200%
### Test Retries
Configure automatic retries when a test fails. Docket will re-run the entire test from the beginning.
**Options:** No retries (default), 1-3 retries
### Suite Run Behavior
* **Included** (default): Test runs in all scenarios
* **Skipped**: When a test suite is triggered to which this test belongs, this test is skipped and not run. The only way to run this test is via a [Trigger Run](#trigger-run) step or manually through the UI
### Persist Self-Healed Actions
When enabled, if the AI agent self-heals a recorded step during test execution (e.g., because a button moved), the updated action automatically replaces the original in your test definition. This keeps your tests up to date as your UI evolves without manual re-recording.
**Options:** Disabled (default), Enabled
### File Download Behavior
Controls how the agent handles files downloaded during a test (e.g., CSV exports, PDF reports).
* **Save Only** (default): The file is saved but its contents are not read
* **Ingest Content**: The file is saved **and** its contents are extracted and injected into the agent's context, allowing subsequent assert steps to verify file contents
This is particularly useful for testing export functionality — for example, asserting that a downloaded CSV contains the expected data.
### Typing Speed
Set the delay between keystrokes in milliseconds. Range: 12ms–1000ms (default: 12ms).
### Two-Factor Authentication (2FA)
Store TOTP secrets for automated 2FA during testing. Enter the secret key from your authenticator app setup, and Docket will automatically generate codes when prompted.
### Browser Zoom Level
Control the browser's zoom level (equivalent to `Ctrl +/-` in Chromium). Useful for testing responsive design and accessibility.
**Options:** 50%, 75%, 100% (default), 125%, 150%, 200%
### Test Retries
Configure automatic retries when a test fails. Docket will re-run the entire test from the beginning.
**Options:** No retries (default), 1-3 retries
### Suite Run Behavior
* **Included** (default): Test runs in all scenarios
* **Skipped**: When a test suite is triggered to which this test belongs, this test is skipped and not run. The only way to run this test is via a [Trigger Run](#trigger-run) step or manually through the UI
### Persist Self-Healed Actions
When enabled, if the AI agent self-heals a recorded step during test execution (e.g., because a button moved), the updated action automatically replaces the original in your test definition. This keeps your tests up to date as your UI evolves without manual re-recording.
**Options:** Disabled (default), Enabled
### File Download Behavior
Controls how the agent handles files downloaded during a test (e.g., CSV exports, PDF reports).
* **Save Only** (default): The file is saved but its contents are not read
* **Ingest Content**: The file is saved **and** its contents are extracted and injected into the agent's context, allowing subsequent assert steps to verify file contents
This is particularly useful for testing export functionality — for example, asserting that a downloaded CSV contains the expected data.
### Typing Speed
Set the delay between keystrokes in milliseconds. Range: 12ms–1000ms (default: 12ms).
### Two-Factor Authentication (2FA)
Store TOTP secrets for automated 2FA during testing. Enter the secret key from your authenticator app setup, and Docket will automatically generate codes when prompted.